This page may contain affiliate links. If you click and make a purchase through these links, I may earn a small commission at no additional cost to you. Click here to see my full disclosure policy.

Tuesday, August 31, 2010

Reminder: Lettering Delights coupons expire today!


Today is the last day for extra savings at the Lettering Delights $1 sale. The Bonus coupons for the LD store expires at midnight MDT. If you have been waiting to get any of their graphic sets, get them now before the coupons expire today.

Click on the following ad to go to the LD website.


Monday, August 30, 2010

Sneak Peek- Harajuku Girls!


Look what's coming soon at Lettering Delights:


We love the Harajuku Lovers dolls in my house and if the girls images in this set are anything like the HL dolls then I MUST have it. I can't wait till this set is released.

How to "CUT-and-PRINT" Lettering Delights images with MTC and the Cricut

--------------------------------------------------------------------------------------------------------------
This tutorial was written before the release of MTC version 3.0.0 beta.
MTC v.3.0.0 beta includes a print feature and you can now do print-and-cut with MTC alone (without the use of Adobe Photoshop.) To learn how, please visit the MTC forum and search for more info on "print and cut". Thank you.
--------------------------------------------------------------------------------------------------------------


"Cut-and-Print" or "Print-and-Cut" essentially means the same thing. Instead of creating a complete cutout image with layering or paper piecing, the image is printed on a cutout of its own outline. In my last post I have mentioned that you can use the cut-and-print method on the Lettering Delights images that are too challenging to create layers with. Today I will show you how I do this with Adobe Photoshop, Make-the-Cut, and the Cricut.


For this post, I will be using the Garden Kokeshi set.


Using Adobe Photoshop, I open the image and print it on regular printer paper.

I set the size of the printed image and note the dimensions as I will need these numbers later.

Once the image has printed in the required size, create the shadow by filling it with black using the Paint Bucket. I also use the Adjust Brightness/Contrast feature to hasten the process of blacking out the image. I set Brightness to -150 and the Contrast to +100.

Save this image. Use a different file name so that you do not overwrite the original colored image.


Next I open MTC and "Pixel Trace" the blacked-out image. Import and set the size with the same dimensions that were used to print the colored graphic. I usually just enter the Height or the Width and not both as I do not want to distort the image. Sometimes you can't get both dimensions the same as what you got in Photoshop. For example, for this doll, when I enter "2" for Width, I get "3.3771" for Height in MTC instead of "3.298" like in Photoshop. It does not bother me that the MTC sizing does not match exactly as the one from Photoshop because I am going to create a border around the printed image anyway. We will talk about this later.

Since all I need is an outline of the original image, I use "Break Apart" and delete away the extra cuts if there are any. If not, you may skip this step.

To create a border around the final printed cutout, I use "CTRL-H". Set the shadow width to your preference. I usually use a number between 0.7 to 0.9.

Delete the layer of the original imported image.

What I am left with is just the shadow layer.


Using a tiny strip of double stick tape (e.g. Scotch Scrapbooking Tape), temporarily adhere the cutout over the printed image. To make sure that the cutout is in the exact position, I hold the page against the light and shift the cutout as needed. Using a light box would probably be a good idea too.


The cutout in the image above has not been taped down yet. My mat is new and very sticky so the cutout curled when I removed it from the mat. It should lay flat and directly over the printed image on the paper.

Once the cutout is in place, put the page back into the printer feeder tray and print the image again.

Ta-da! The printed cutout is done!


This method works great for images that are challenging to create layers with. I also used it to create these cutouts from LD's Mad Tea Party graphic set.


Of course, you can always print and cut with a pair of scissors but I find it strangely satisfying to use my Cricut instead.



Thursday, August 26, 2010

How to choose Lettering Delights images for MTC and the Cricut


While many of us are already familiar with Lettering Delights, it can be challenging for the beginner crafter to figure out which one of their offerings would work well with the Cricut. This quick guide is designed to give you an idea of what to look for when you are shopping for a LD graphic for use with Make-the-Cut (or SCAL) and your Cricut die-cutting machine. The sets recommended below are just a small selection of what I personally think would work well. There are plenty more on the LD website.

When I shop at LD or any other online seller of digital graphics I look for images that are bold and have little details. Textured images and those with a lot of details might be more difficult to work with and may not trace well in MTC. I also try to visualize the layers and where the images could possibly have what is commonly known as "broken lines". I will avoid those as well. Here are just a few of what I think are easy to cut with programs like MTC:

Doodlebats:

Doodlebats are Lettering Delights' version of dingbats. They are downloaded as .ttf or TrueTypeFonts files and can be used in MTC like a font. These are the easiest LD graphic files to work with as you do not need to convert them first in other graphic editing programs like Adobe Photoshop. You can just do a "Add font from TTF file" in MTC and use them like you would any other font file.

Here are a few Doodlebats that should work well in MTC with minimal (if at all) tweaking. Notice that they are have little details and are mainly solid images.


Graphic sets:

Images from the Lettering Delights' Graphic Sets may need to be converted first in Inkscape or a graphics editing program like Adobe Photoshop and then traced in MTC. You can watch my video tutorial on converting LD images in Adobe Photoshop here.


The Pun Intended graphics set is a LD Sneak Peek of the Month and was only available to purchase when you buy something else. However, during this sale, it is available with or without another purchase. This is one of the easiest sets to convert as the lines are mostly (if at all) unbroken. The images are bold and the colors help in figuring out the layers. In fact, some of the images do not even need any conversions. I used the brown elephant in this set for my elephant cards and all that I needed to do was to do a "Pixel Trace" in MTC. You can also do the same for the red car in this set.


I just had to include the You Take the Cupcake graphic set in this list as it is so similar to the Cricut SWEET TREATS cartridge.


The images in this Around the World Sites seems daunting but they are easier to convert than they look. Some may have a lot of layers (St. Basil's Cathedral, and the Taj Mahl) but others (Eiffel Tower, Leaning Tower of Pisa) have less. I am including this set in my list because the images are different from what you can currently find in a Cricut cartridge. I used this set in my recent Pan-Dee post.


Cliparts:

Personally I like to use Doodlebats and the LD Graphic Sets for my cards but I have heard of success stories from crafters who use the Cliparts instead. I view the cliparts as sort of an in-between Doodlebats and Graphic Sets item. They are not fonts so you cannot do a "Add font" in MTC and you will still have to do a trace BUT you do not need to use any program to convert the image. As there is already a black and white image within a Clipart set, you can just do a "Pixel Trace" in MTC of the uncolored image.

I have not used any LD cliparts in my cards but I think that these would trace easily in MTC:


Venturing outside of cartridges can be scary but with the Lettering Delights $1 sale(AND coupons),  it really is a great time to try out their images for cutting. Remember that although I had mentioned that I avoid textured and detailed images for cutting layers, such graphics still work great for print-and-cut. Graphic sets like Garden Kokeshi could pose a challenging in converting to a cut-able file but it is perfect for printing and cutting.


Even though I use my low-tech method of cut and print (print on scrap paper, then adhere my cutout temporarily over that printed page, and print over the cutout again), Kay over at Clever Someday has a great tutorial on her "Hinge Method" of printing and cutting.

Another point to note is that some graphic sets have equivalent Doodlebat versions. The latter will save you some time since you don't have to convert in Inkscape or any other graphics editor. For example,


I hope that this quick guide has helped you in your selection of LD sets. Kay also has a good list of doodlebats for beginners at her blog and you are welcome to check her list out too. 

Do take advantage of the Lettering Delights $1 sale. As far as I know, they usually have this sale only two times a year and now that they have two limited-time use coupons, it makes for a really good deal. How can you not try them out?

To go to the sale, just click on this banner:


Lettering Delights Coupons!


I just received this in my email:

You can use these with the current $1 sale and get an awesome good deal! Just click here or any LD banners on this blog to go to the Lettering Delights website.


Tuesday, August 24, 2010

Dollar Days are here!


The Lettering Delights $1 sale is one of my favorite sales and IT'S HERE!

For a limited time, all LD products, except mini albums, software, and bundles are on sale for only $1.

ONE DOLLAR! 


Here are a few things that I have made with LD fonts and images and Make-the-Cut:


If you have been wanting to try out my LD tutorial but did not have any suitable LD font or graphic that you like, now would be the best time to get it.


Just click here or any of the Lettering Delights banner on this blog to go to the sale.

Dollar Days


Happy Shopping!


Another LD newsletter mention


Have you seen the August Lettering Delights newsletter? If you did, you would probably have noticed this:


 Do you recognize those cards? If you missed my blog post about the elephants, just click here to go to that page. 


Wednesday, August 18, 2010

Oh! The places you will go!


Panda: Create-A-Critter cartridge
Font: LD Susie
Make-the-Cut software was used to cut out all the images.


I made some alterations to the original hot air balloon image by removing the lines that hold up the basket so that I can attach the black cording. Speaking of threads, that cord was generously donated by Twin B. She insists that I have to mention her generosity because now her beading box is without some black strings.

The saying was cut out on black vinyl using these settings: Blade:3, Pressure: 3, Speed: 3.

The panda was cut at 1" and the overall page measures 10" x 10". Originally, I had planned on making a card with this idea but the page became too big so I made it into a wall hanging instead. I bought the square picture frame from Michael's ($9.99 less 40% coupon). I would have preferred putting the page in a white frame but black and brown were all M's had. Most of the cuts were made with paper that were leftover from my other projects. If you have a lot of scraps, this might be a good way to use up some of them.


A special mention

I hope that you are all enjoying your summer. There are two weeks left before my kids go back to school and there is still so much to do. I am working on a new Pan-Dee post but until I can finish that, I would like to share this with you:


Have you watch my tutorial on converting Lettering Delights graphics? Did you use my method to cut out non-Provocraft images? Denise did and I thought she did a wonderful job with her peacock. You can check out her work here:


Great job, Denise!

Friday, August 13, 2010

New MS punches!

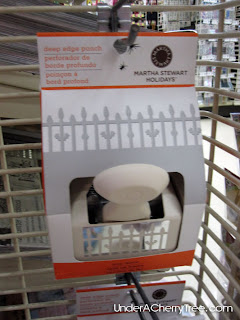
I went back to the local Michael's store yesterday to pick up the EK Success Cupcake punch that I had left behind last week and found these new Martha Stewart punches. Have you seen these at your store? Some of the Halloween punches seem to be sold out already. I saw the hang tags for the Spider border and corner punches but of cause the pegs were empty. If you click on each photo, you can see it in an enlarged view.


I also found these Fiskars punches fascinating.


These are some of the new large size EK Success Border punches. 

All the punches are 40% off this week but I ended up not buying the cupcake punch after all. I did go home with one set of the MS Bubble Bath Border and Corner punches though. The set is $24.99 but I had a 50% coupon and I just had to use it. :P